This guide will walk you through the steps of installing and configuring Nym Node version 1.1.6 on a Linux environment, from downloading the binary to running the node. If you’re looking to quickly and effectively set up a Nym Node, this article will provide all the necessary commands.
1. Create a Directory for Nym Node Binary
First, create a directory to store the Nym Node binary files. This helps with easier management and future updates.
mkdir nym-binaries

cd nym-binaries
2. Download Nym Node Binary from GitHub
After creating the directory, download the Nym Node binary from the official GitHub page:
wget https://github.com/nymtech/nym/releases/download/nym-binaries-v2024.9-topdeck/nym-node
Once the command completes, the nym-node file will appear in the nym-binaries directory.
3. Grant Execute Permission to the Binary
To run the nym-node file, you need to grant it execute permission:
chmod +x nym-node
4. Create and Configure a Nym Node
Now, you can initialize a new Nym Node using the following command. Replace with the name you want for your node. For example, if you want to name your node jack_nym_node, run:
./nym-node run --id jack_nym_node --init-only --mode mixnode --verloc-bind-address 0.0.0.0:1790 --public-ips "$(curl -4 https://ifconfig.me)" --accept-operator-terms-and-conditions
This command will create a new node and save the configuration at:
/root/.nym/nym-nodes/jack_nym_node/config/config.toml
5. Perform Bonding for Your Nym Node
Next, you need to retrieve bonding information to input into the Nym Wallet. Run the following command:
./nym-node bonding-information --id jack_nym_node
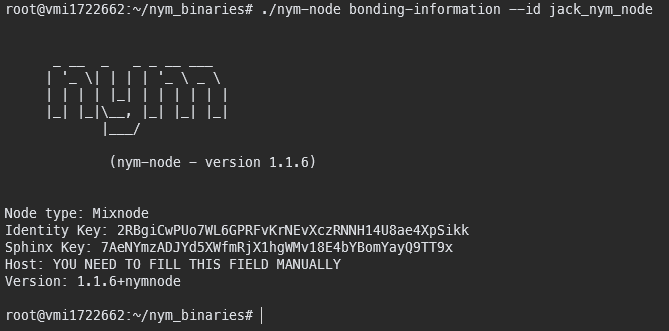
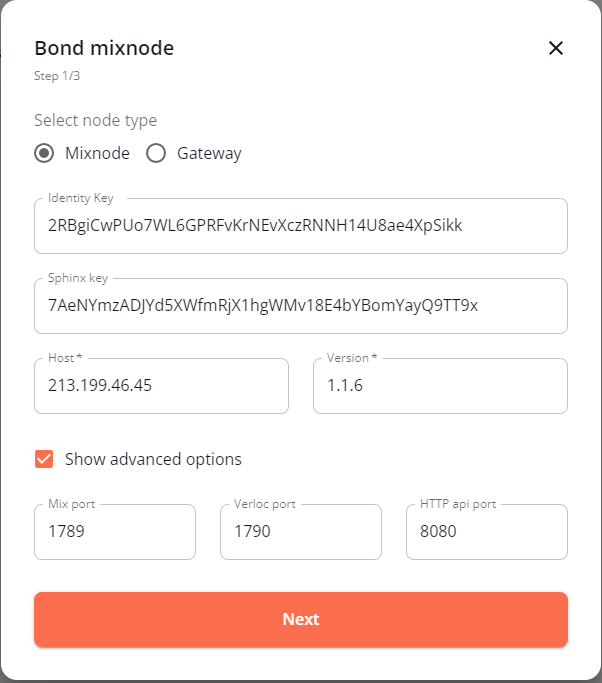
6. Enter Bonding Information in the Nym Wallet
Input the bonding information you retrieved into the Nym Wallet.
7. Sign the Contract Message
After entering the bonding information and getting the payload from the Nym Wallet, you need to sign the payload:
./nym-node sign --id jack_nym_node --contract-msg <PAYLOAD_GENERATED_BY_THE_WALLET>
Replace <PAYLOAD_GENERATED_BY_THE_WALLET> with the payload you received from the Nym Wallet.
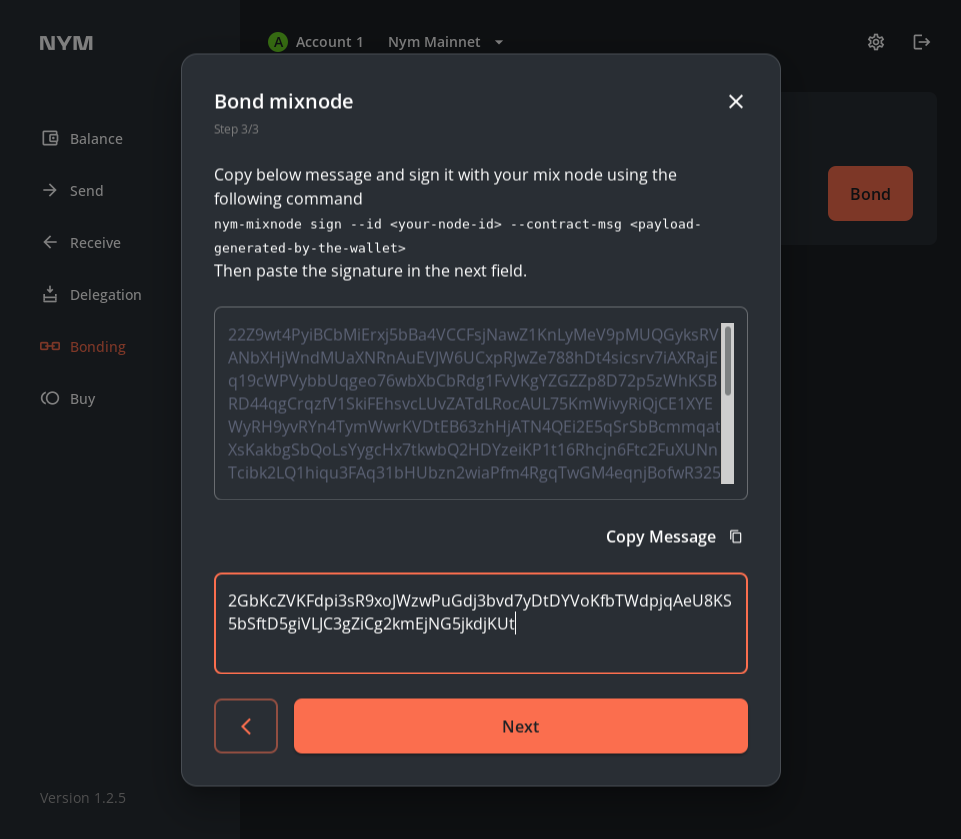
8. Complete Bonding in the Nym Wallet
Copy the signature you just generated and paste it into the payload section of the Nym Wallet to complete the bonding process.
9. Run Your Nym Node
Finally, after completing all the steps above, you can run your Nym Node with the following command:
./nym-node run --id jack_nym_node --deny-init --mode mixnode --accept-operator-terms-and-conditions

With these straightforward commands, you can quickly set up a fully functioning Nym Node on your VPS. If you encounter any issues, double-check each step to ensure everything is configured correctly. Best of luck, and enjoy your journey with the Nym Network!
Bài viết này sẽ hướng dẫn bạn từng bước cài đặt và cấu hình Nym Node phiên bản 1.1.6 trên môi trường Linux, từ việc tải binary cho đến chạy thử node. Nếu bạn đang tìm cách thiết lập một Nym Node một cách nhanh chóng và hiệu quả, bài viết này sẽ cung cấp cho bạn tất cả các lệnh cần thiết.
1. Tạo Thư Mục Chứa Binary Nym Node
Trước tiên, chúng ta cần tạo một thư mục để lưu trữ các file binary của Nym Node. Điều này giúp bạn dễ dàng quản lý và cập nhật phiên bản sau này.
mkdir nym-binaries

cd nym-binaries
2. Tải Nym Node Binary Từ GitHub
Sau khi tạo thư mục, hãy tải file binary của Nym Node từ trang GitHub chính thức:
bash
wget https://github.com/nymtech/nym/releases/download/nym-binaries-v2024.9-topdeck/nym-node
Sau khi lệnh hoàn thành, file nym-node sẽ xuất hiện trong thư mục nym-binaries.
3. Cấp Quyền Thực Thi Cho Binary
Để có thể chạy file nym-node, bạn cần cấp quyền thực thi cho nó:
chmod +x nym-node
4. Tạo và Cấu Hình Nym Node
Đến đây, bạn có thể khởi tạo Nym Node bằng lệnh sau. Thay bằng tên mà bạn muốn đặt cho node. Ví dụ, nếu muốn đặt tên node là jack_nym_node, hãy chạy lệnh sau:
./nym-node run --id jack_nym_node --init-only --mode mixnode --verloc-bind-address 0.0.0.0:1790 --public-ips “$(curl -4 https://ifconfig.me)” --accept-operator-terms-and-conditions
Lệnh trên sẽ tạo một node mới và lưu cấu hình tại:
/root/.nym/nym-nodes/jack_nym_node/config/config.toml
5. Thực Hiện Bonding Cho Nym Node
Tiếp theo, bạn cần lấy thông tin bonding để nhập vào ví Nym. Chạy lệnh dưới đây:
./nym-node bonding-information --id jack_nym_node
6. Điền thông tin bonding vào ví Nym
Nhập thông tin bonding mà bạn đã lấy được vào Ví Nym.
7. Ký Giao Dịch (Sign Contract Message)
Sau khi nhập thông tin bonding vào ví Nym và lấy được payload, bạn cần ký payload này:
./nym-node sign --id jack_nym_node --contract-msg <PAYLOAD_GENERATED_BY_THE_WALLET>
Thay <PAYLOAD_GENERATED_BY_THE_WALLET> bằng payload mà bạn nhận được từ ví Nym.
8. Hoàn Tất Bonding Trong Ví Nym
Sao chép chữ ký (signature) vừa tạo và dán vào payload trong ví Nym để hoàn tất quá trình bonding.
9. Chạy Thử Nym Node
Cuối cùng, sau khi đã hoàn thành tất cả các bước trên, bạn có thể khởi chạy Nym Node của mình bằng lệnh:
./nym-node run --id jack_nym_node --deny-init --mode mixnode --accept-operator-terms-and-conditions
Vậy là bạn đã hoàn tất quá trình cài đặt và thiết lập Nym Node trên VPS của mình. Với các lệnh đơn giản và rõ ràng trên, bạn có thể nhanh chóng thiết lập một node hoạt động hiệu quả. Nếu gặp khó khăn, hãy kiểm tra lại từng bước để đảm bảo mọi thứ được cấu hình đúng cách. Chúc bạn thành công và có những trải nghiệm tuyệt vời cùng Nym Network!